Hyundai Genesis: Air Conditioning System / Receiver-Drier Repair procedures

Replacement
1.
Remove the condenser.
2.
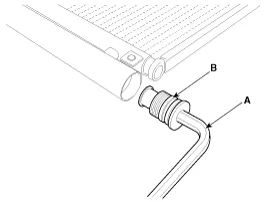
Remove the cap (B) on the bottom of the condenser with the L wrench (A).


Tightening torque :
9.81 ~ 14.71 N.m (1.0 ~ 1.5 kgf.m, 7.2 ~ 10.8 lb-ft)

3.
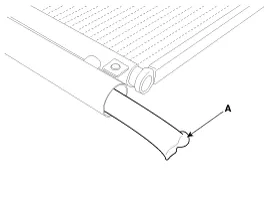
Remove the receiver-drier (A) from condenser using a long nose plier. Check for crumbled receiver-drier and clogged bottom cap filter.

4.
Apply air conditioning compressor oil along the O-rings and threads of the new bottom cap.
5.
Insert a new receiver-drier into the receiver drier tank. The receiver-drier must be sealed in vacuum before it is exposed to air for use.
6.
Install a new bottom cap to the condenser.
   
Always replace the receiver-drier and bottom cap at the same time.
Replace the O-rings with new ones at each fitting, and apply a thin coat of refrigerant oil before installing them. Be sure to use the right O-rings for R-134a to avoid leakage.
Be careful not to damage the radiator and condenser fins when installing the condenser.
Charge the system, and test its performance.
Condenser Repair procedures
Inspection 1. Check the condenser fins for clogging and damage. If they are clogged, clean them with water, and blow them with compressed air. If they are bent, gently bend them using a screwd ...

A/C Pressure Transducer Description and Operation
Description The A/C Pressure Transducer (APT) converts the pressure value of high-pressure line into voltage value after measuring it. By converted voltage value, engine ECU controls the coolin ...

Other information:

Hyundai Genesis (DH) 2013-2016 Service Manual: Front Axle Flange Repair procedures


Removal     Use caution when handling the transfer case. Preventing the ITA (Integrated Transfer case Actuator ) from damage 1) In case of transporting the transfer case • Use caution when lifting the transfer case from the transporting package to make sure the ITA d ...

Hyundai Genesis (DH) 2013-2016 Service Manual: Rear Door Window Glass Repair procedures


Replacement 1. Pull down rear door window glass by pressing the power window glass switch. 2. Remove the rear door trim. (Refer to Rear Door - "Rear Door Trim") 3. After loosening the mounting screws, remove the rear door belt outside weatherstrip (A). 4. After loosening the mounti ...

© 2013-2024 www.hgenesisdh.com