Hyundai Genesis: Interior Trim / Rear Pillar Trim Repair procedures
| • |
Put on gloves to prevent hand injuries. |
|
| • |
When removing with a flat-tip screwdriver or remover, wrap protective tape around the tools to prevent damage to components. |
| • |
When removing the interior trim pieces, use a plastic panel removal tool not to damage the surface. |
| • |
Take care not to bend or scratch the trim and panels. |
|
| 1. |
Carefully remove the rear door body side weatherstrip. |
| 2. |
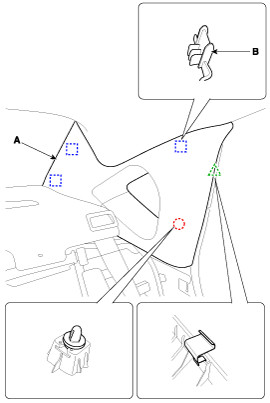
Remove the rear pillar trim (A) by pushing the side of clip (B) using a proper tool.
| • |
Replace the clip (B) with a new one whenever replacing the rear pillar trim. |
|
| • |
When removing the rear pillar trim, be careful not to damage
the rear pillar trim and the clips specially designed for the proper
airbag deployment. |
| • |
If the rear pillar trim is removed forcibly, the body panel and rear pillar trim get damaged. |
|
|
| 3. |
Install in the reverse order of removal.
| • |
Replace any damage clips. |
|
|
Component Location
1. Rear pillar trim
...
Component Location
1. Rear wheel house trim
...
Other information:
Inspection
1.
Connect the GDS on the Data Link Connector (DLC).
2.
If there is DTC on the GDS, replace the FPCM.
3.
Check the output voltage of fuel pressure sensor (FPS).
Specification: 5V
4.
Check the output voltage of fuel pressure sensor (FPS) at idle.
Specification: 1.4 ...
Component Location
1. Rear door trim
...


 Rear Pillar Trim Components and Components Location
 Rear Wheel House Trim Components and Components Location