Hyundai Genesis: Rear Door / Rear Door Module Repair procedures

Replacement
1.
Remove the rear door window glass.
(Refer to Rear Door - "Rear Door Window Glass")
2.
Remove the rear door outside handle.
(Refer to Rear Door - "Rear Door Outside Handle")
3.
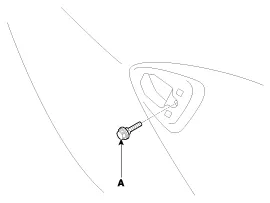
Loosen the rear door outside handle base mounting bolt (A).

4.
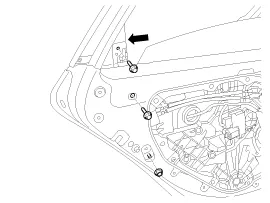
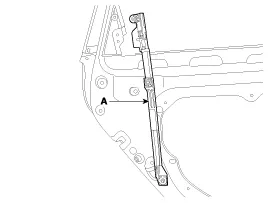
After loosening the mounting bolts and nuts, remove the rear door outside handle by pulling upward the rear door channel (A).

Tightening torque :
Bolt : 6.9 ~ 10.8 N.m (0.7 ~ 1.1 kgf.m, 5.1 ~ 8.0 lb-ft)
Nut : 3.9 ~ 5.9 N.m (0.4 ~ 0.6 kgf.m, 2.9 ~ 4.3 lb-ft)

5.
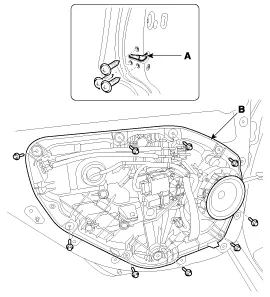
Loosen the rear door latch (A) mounting screws.
6.
After loosening the mounting bolts, remove the rear door module (B).

Tightening torque :
Bolt : 7.8 ~ 11.8 N.m (0.8 ~ 1.2 kgf.m, 5.8 ~ 8.7 lb-ft)
Screw : 6.9 ~ 10.8 N.m (0.7 ~ 1.1 kgf.m, 5.1 ~ 8.0 lb-ft)

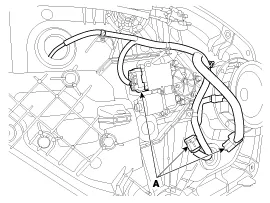
7.
Disconnect the connectors (A) and front door module wiring harness.

8.
Remove the rear door latch assembly.
(Refer to Front Door - "rear Door Latch")
9.
Remove the rear speaker .
(Refer to Body Electrical System - "Speakers")
10.
Remove the rear power window motor.
(Refer to Body Electrical System - "Power Window Motor")
11.
Install in the reverse order of removal.
   
Make sure connectors are connected properly and each rod is connected securely.
Make sure the door locks/unlocks and opens/closes properly
Rear Door Module Components and Components Location
Component Location 1. Rear door module ...

Rear Door Outside Handle Components and Components Location
Component Location 1. Rear door outside handle ...

Other information:

Hyundai Genesis (DH) 2013-2016 Service Manual: Repair procedures


Diagnosis With GDS 1. BSD system defects can be quickly diagnosed with the GDS. GDS operates actuator quickly to monitor, input/output value and self diagnosis. 2. Connect the cable of GDS to the data link connector in driver side crash pad lower panel, and turn on the GDS. 3. Select ...

Hyundai Genesis (DH) 2013-2016 Service Manual: Shift Lever Repair procedures


Removal 1. Remove the console upper cover (A). 2. Pull the shift lever knob (B) upward to remove it. 3. Remove the knob&boots(A) from the console upper cover. 4. Remove the floor console. (Refer to Body - "Floor Console") 5. Disconnect the connector (A) from the shift lev ...

© 2013-2025 www.hgenesisdh.com