Hyundai Genesis (DH): Rear Curtain System / Rear Curtain Repair procedures
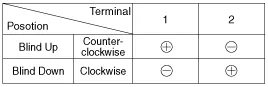
| Inspection |
| Removal |
| 1. |
Disconnect the negative (-) battery terminal. |
| 2. |
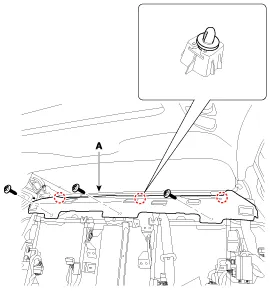
Remove the rear package tray trim (A) after removing the rear seat.
(Refer to Body - "Rear Package Tray Trim")
|
| 3. |
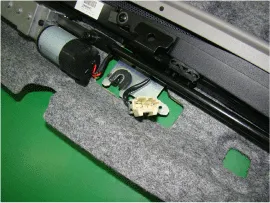
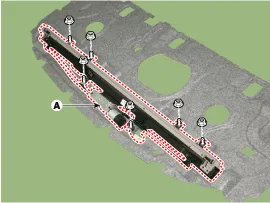
Remove the rear curtain (A) after disconnecting the connector and rear curtain mounting nuts.
|
| Installation |
| 1. |
Install the rear curtain after connecting the connector. |
| 2. |
Install the rear package trim and rear seat. |
| 3. |
Connect the negative battery terminal. |
Description The rear curtain is AUTO UP/AUTO DOWN by one-touch operation of the switch. The curtain covers the inner side of the rear glass to keep passengers out of direct sunlight.
Other information:
Hyundai Genesis (DH) 2013-2016 Service Manual: General Safety Information and Caution
Instructions When Handling Refrigerant 1. R-134a liquid refrigerant is highly volatile. A drop on the skin of your hand could result in localized frostbite. When handling the refrigerant, be sure to wear gloves. 2. It is standard practice to wear goggles or glasses to protect your eyes, and gloves to protect your hands.
Hyundai Genesis (DH) 2013-2016 Service Manual: Heater & A/C Control Unit Repair procedures
Self Diagnosis 1. Self-diagnosis process 2. How to read self-diagnostic code After the display panel blinks three times every 0.5 second, the corresponding fault code blinks on the setup temperature display panel every 0.5 second and will show two figures.
Categories
- Manuals Home
- Hyundai Genesis Owners Manual
- Hyundai Genesis Service Manual
- Components and Components Location
- Active Air Flap(AAF) Repair procedures
- Heating, Ventilation and Air Conditioning
- New on site
- Most important about car
