Hyundai Genesis: Power Door Mirrors / Power Door Mirror Actuator Repair procedures
Hyundai Genesis (DH) 2013-2016 Service Manual / Body Electrical System / Power Door Mirrors / Power Door Mirror Actuator Repair procedures
| Inspection |
| 1. |
Disconnect the negative (-) battery terminal. |
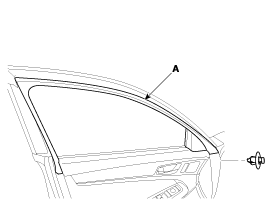
| 2. |
Disconnect the connector (B) after removing the front door frame inner cover (A).
|
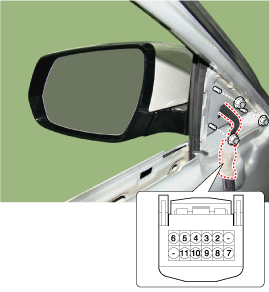
| 3. |
Disconnect the power door mirror connector (A) from the harness.
|
| 4. |
Apply battery voltage to each terminal as shown in the table and verify that the mirror operates properly.
[Turn Signal Lamp]
|

Diagnosis With GDS
| 1. |
In the body electrical system, failure can be quickly diagnosed by using the vehicle diagnostic system (GDS).
|
| 2. |
Select the 'Car model' and the system to be checked in order to check the vehicle with the tester. |
| 3. |
Select the 'Driver seat or Assistant seat door module (DDM/ADM)' to check the driver seat or assistant door module (DDM/ADM). |
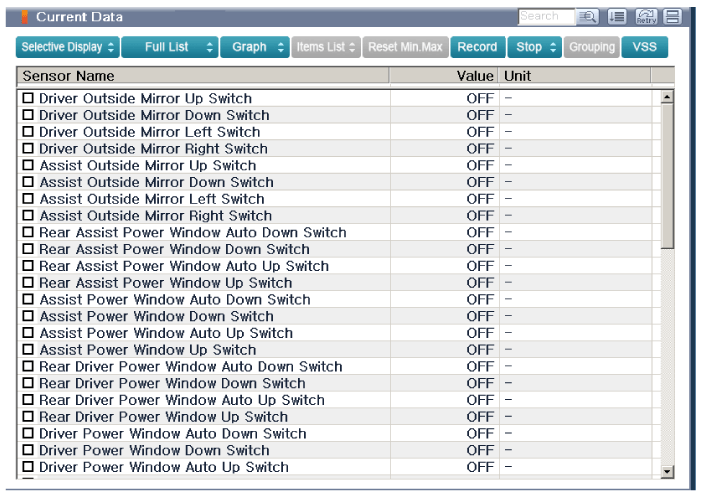
| 4. |
Select the "Current Data" menu to search the current state of the input/output data.
The input/output data for the sensors corresponding to the driver seat or assistant door module(DDM/ADM) can be checked.
|
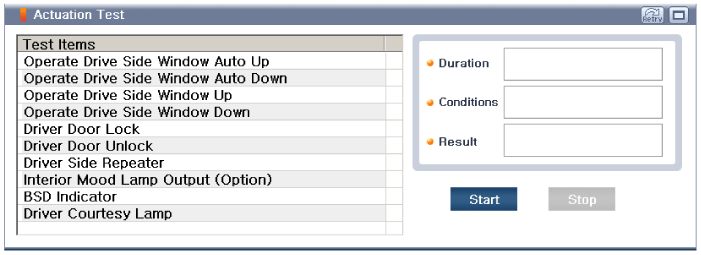
| 5. |
If you will check the power door lock operation forcefully, select "Actuation test".
|
 Power Door Mirror Actuator Components and Components Location
Components
1. AVM Camera2. Ambient temperature sensor3. Puddle lamp
...
 Power Windows
...
Other information:
Hyundai Genesis (DH) 2013-2016 Service Manual: BLUE LINK Unit(I-BOX) Repair procedures
Removal 1. Remove the battery(-) terminals. 2. Remove the AVN monitor. (Body - "Premium AVN System" ) 3. Disconnect the cables and connectors (A) from the MTS unit. 4. Remove the MTS unit after loosening the screws and nut. Installation 1. Tighten the connector and cable to the ...
Hyundai Genesis (DH) 2013-2016 Owners Manual: Emission control system
The emission control system of your vehicle is covered by a written limited warranty. Please see the warranty information contained in the Owner’s Handbook & Warranty Information booklet in your vehicle. Your vehicle is equipped with an emission control system to meet all applic ...
© 2013-2025 www.hgenesisdh.com
