Hyundai Genesis (DH): Rear Curtain System / Rear Curtain Switch Repair procedures
Hyundai Genesis (DH) 2013-2016 Service Manual / Body Electrical System / Rear Curtain System / Rear Curtain Switch Repair procedures
| Removal |
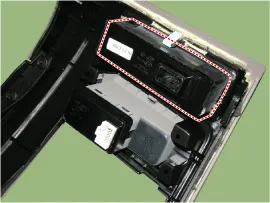
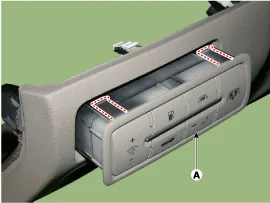
Crash pad lower panel switch
| 1. |
Disconnect the negative (-) battery terminal. |
| 2. |
Remove the crash pad lower panel.
(Refer to Body - "Crash Pad Lower Panel") |
| 3. |
Remove the crash pad lower panel switch (A) after disengaging the mounting clip.
|

Rear Seat Armrest Switch
| 1. |
Disconnect the negative (-) battery terminal. |
| 2. |
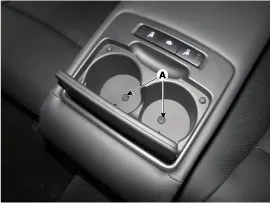
Remove the drink holder pad (A).
|

| 3. |
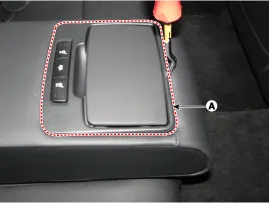
Loosening the mounting screws (A).
|
| 4. |
Using a screwdriver or remover, remove the rear seat armrest drink holder assembly (A).
|
| 5. |
Disconnect the connector (B).
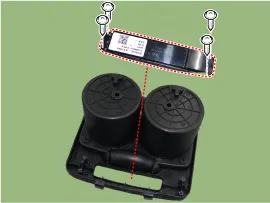
|
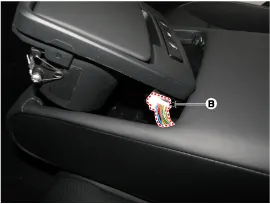
| 6. |
Remove the curtain switch (A) after loosening the mounting screws.
|
| Installation |
Crash pad lower panel switch
| 1. |
Install the side crash pad switch assembly. |
| 2. |
Install the crash pad lower panel. |
| 3. |
Connect the negative (-) battery terminal. |
Rear Seat Armrest Switch
| 1. |
Install the rear curtain switch. |
| 2. |
Install the rear seat armrest in the armrest. |
| Inspection |
Inspection of a rear curtain
Auto up/down function
| Initial condition | Inspection list | Normal value |
| 1) IGN ON (DC 12V) | 1) Rear curtain UP state - Rear curtain switch input(ON) | Rear curtain DOWN |
| 2) Rear curtain DOWN state - Rear curtain switch input(ON) | Rear curtain UP | |
| 3) Rear curtain AUTO UP/DOWN activating - Rear curtain switch input(ON) | Reversal movement |
Reverse interlocking function
| Initial condition | Inspection list | Normal value |
| 1) IGN ON(DC 12V) 2) Rear curtain UP | 1) Transmission lever(P,D,N)->R | Rear curtain DOWN |
| 2) Rear curtain DOWN by No.1) - Below 20 Km/h in the transmission lever D,N | Rear curtain DOWN | |
| 3) Rear curtain DOWN by No.1) - Over 20 Km/h in the transmission lever D,N | Rear curtain UP | |
| 4) Rear curtain DOWN by No.1) - Transmission lever P | Rear curtain UP |
If a driver operates the rear curtain down by a rear curtain switch, the rear curtain doesn't do AUTO return. |

Other information:
Hyundai Genesis (DH) 2013-2016 Service Manual: Photo Sensor Description and Operation
Description The photo sensor is located in the right side of the inside rearview mirror. he integrated rain sensor is located in the right side of the inside rearview mirror. The integrated rain sensor is a multifunctional sensor which combines the photo sensor and auto light sensor, and has a built-in photovoltaic diode (for detecting t
Hyundai Genesis (DH) 2013-2016 Service Manual: Power Mosfet Repair procedures
Inspection 1. Turn the ignition switch ON. 2. Manually operate the control switch and control the voltage of the blower motor. 3. Select the control switch to raise the voltage until high speed. Specification Fan Speed (Manual)Motor Voltage (V)13.
Categories
- Manuals Home
- Hyundai Genesis Owners Manual
- Hyundai Genesis Service Manual
- Parking Assist Sensor Repair procedures
- Body Electrical System
- Description and Operation
- New on site
- Most important about car

Copyright © 2026 www.hgenesisdh.com - 0.0236