Hyundai Genesis (DH): Brake System / Brake Line Repair procedures
Hyundai Genesis (DH) 2013-2016 Service Manual / Brake System / Brake System / Brake Line Repair procedures
| Removal |
| 1. |
Disconnect the brake fluid level switch connector, and remove the reservoir cap. |
| 2. |
Remove the brake fluid from the master cylinder reservoir with a syringe. |
| 3. |
Remove the wheel & tire. |
| 4. |
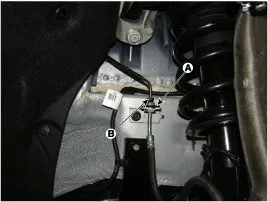
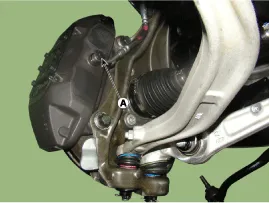
Disconnect the brake hose clip (A) and then remove the brake tube by loosening the tube flare nut (B).
[Front]
[Rear]
|

| 5. |
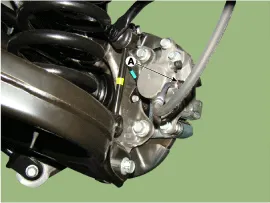
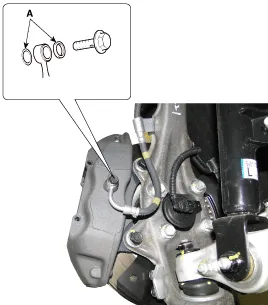
Disconnect the brake hose from the brake caliper by loosening the bolt (A).
[Front]
[Rear]
|
| Inspection |
| 1. |
Check the brake tubes for cracks, crimps and corrosion. |
| 2. |
Check the brake hoses for cracks, damage and fluid leakage. |
| 3. |
Check the brake tube flare nuts for damage and fluid leakage. |
| 4. |
Check brake hose mounting bracket for crack or deformation. |
| Installation |
| 1. |
To install, reverse the removal procedure.
|

| 2. |
After installation, bleed the brake system.
(Refer to Brake System - "Brake System Bleeding") |
| 3. |
Check for brake fluid leaks. |
Components 1. Brake pedal member assembly2. Stop lamp switch3. Clevis pin4. Snap pin5. Brake pedal stopper6. Return spring7. Bolt
Other information:
Hyundai Genesis (DH) 2013-2016 Service Manual: Description and Operation
Description System Overview The System offers the following features: - Changing the state of engine ignition and power by using the start button. - Controlling external relays for ACC / IGN1 / IGN2 terminal switching and STARTER, without use of mechanical ignition switch.
Hyundai Genesis (DH) 2013-2016 Service Manual: Specifications
S
Categories
- Manuals Home
- Hyundai Genesis Owners Manual
- Hyundai Genesis Service Manual
- Starter Repair procedures
- Repair procedures
- Restraint
- New on site
- Most important about car

Copyright © 2026 www.hgenesisdh.com - 0.0223