Hyundai Genesis: Cylinder Head Assembly / CVVT Assembly Repair procedures
Hyundai Genesis (DH) 2013-2016 Service Manual / Engine Mechanical System / Cylinder Head Assembly / CVVT Assembly Repair procedures
| Removal |
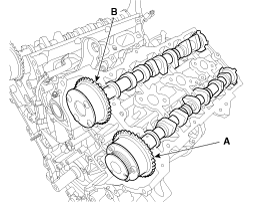
Continuous Variable Valve Timing (CVVT)
| 1. |
Remove the timing chain.
(Refer to Timing System - "Timing Chain") |
| 2. |
Remove the CVVT assembly.
|

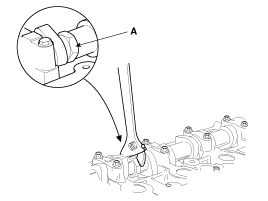
| Inspection |
Continuously variable valve timing (CVVT) Assembly
| 1. |
Clamp the camshaft using a vise. Be careful not to damage the cam lobes and journals while using the vise. |
| 2. |
Check that the CVVT is locked by turning it clockwise or counterclockwise. It is normal that the CVVT does not rotate. |
| 3. |
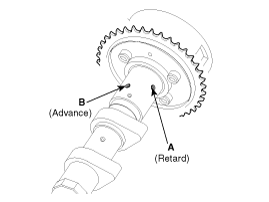
Intake CVVT : Seal one of the two advance holes in the camshaft journal with tape.
Exhaust CVVT : Seal one of the two retard holes in the camshaft journal with tape.
[Intake]
[Exhaust]
|
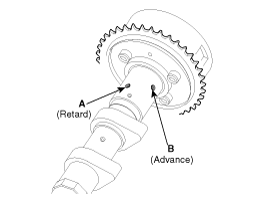
| 4. |
Intake CVVT : Apply approx. 150 kPa (1.5 kgf/cm?, 21 psi )
of compressed air into the unsealed advance hole to release the lock.
Exhaust CVVT : Apply approx. 150 kPa (1.5 kgf/cm?, 21 psi )
of compressed air into the unsealed retard hole to release the lock.
|

| 5. |
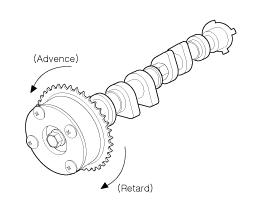
Intake CVVT : With compressed air applied, rotate the CVVT
into the advance direction (counterclockwise) within its phasing range
and check that the CVVT turns smoothly.
Exhaust CVVT : With compressed air applied, rotate the CVVT
into the retard direction (clockwise) and check that the CVVT turns
smoothly.
|
| 6. |
Intake CVVT : Rotate the CVVT into the most retarded position (clockwise) and then check that the CVVT is locked.
Exhaust CVVT : Rotate the CVVT into the most advanced position (counterclockwise) and then check that the CVVT is locked. |
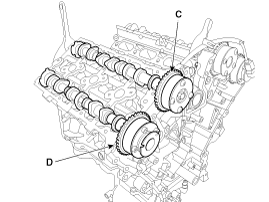
| Installation |
Continuous Variable Valve Timing (CVVT)
| 1. |
Install the continuous variable valve timing (CVVT) assembly.
|
| 2. |
Install the timing chain.
(Refer to Timing System - "Timing Chain") |
 CVVT Assembly Description and Operation
Description
Continuous Variable Valve Timing (CVVT) system advances or
retards the valve timing of the intake and exhaust valve in accordance
with the ECM control signal which is calculated by ...
 Camshaft Components and Components Location
Components
1. RH Exhaust camshaft2. RH Intake camshaft3. LH Intake camshaft4. LH Exhaust camshaft
...
Other information:
Hyundai Genesis (DH) 2013-2016 Service Manual: ON/OFF Solenoid Valve Specifications
Specifications ON/OFF Solenoid Valve ? Control type : Normal low type Control pressure kpa (kgf/cm?, psi)539.36(5.5, 78.23) Internal resistance(?)10~11 ...
Hyundai Genesis (DH) 2013-2016 Service Manual: Power Latch Assembly Description and Operation
Description 1. Power latch lock flow A. When the trunk being open closes, the striker get locked. B. The CLAW rotates (1st step close). C. When the 1st step close is detected, the cinching cable starts rotating. D. The cinching lever starts operating. E. The CLAW rotates for th ...
© 2013-2025 www.hgenesisdh.com
