Hyundai Genesis (DH): Evaporative Emission Control System / Canister Repair procedures
Hyundai Genesis (DH) 2013-2016 Service Manual / Emission Control System / Evaporative Emission Control System / Canister Repair procedures
| Removal |
| 1. |
Turn the ignition switch OFF and disconnect the negative (-) battery cable. |
| 2. |
Remove the rear-left wheel & tire and house cover. |
| 3. |
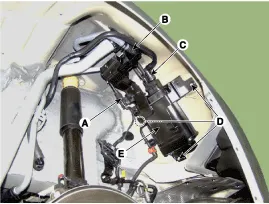
Disconnect the canister close valve connector (A). |
| 4. |
Disconnect the vent hose quick-connector (B). |
| 5. |
Disconnect the vapor hose quick-connector (C). |
| 6. |
Remove the canister assembly (E) after loosening the install nut (D)
|
| 7. |
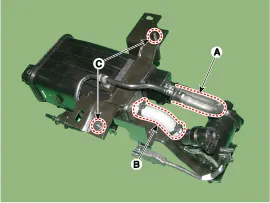
Disconnect the vapor tube (A,B). |
| 8. |
Remove the canister from protector after loosening the fixing nut (C).
|

| Inspection |
| 1. |
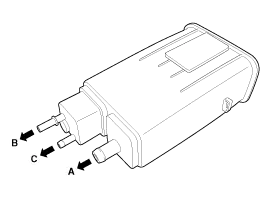
Check for the following items visually.
A: Canister - Atmosphere (via Fuel Tank Air Filter)
B: Canister - Fuel Tank
C: Canister - Intake Manifold
|
| Installation |
| 1. |
To install, reverse the removal procedure. |
Canister installation bolt :
19.6 ~ 29.4 N.m (2.0 ~ 3.0 kgf.m, 14.5 ~21.7 lb-ft)
Canister band installation nut :
3.9 ~ 5.9 N.m (0.4 ~ 0.6 kgf.m, 2.9 ~4.3 lb-ft)
Canister service cover installation bolt :
7.8 ~ 11.8 N.m (0.8 ~ 1.2 kgf.m, 5.8 ~8.7 lb-ft)
Vapor hose connector assembly installation bolt :
3.9 ~ 5.9 N.m (0.4 ~ 0.6 kgf.m, 2.9 ~4.3 lb-ft)
Fuel tank pressure sensor installation bolt:
3.9 ~ 5.9 N.m (0.4 ~ 0.6 kgf.m, 2.9 ~4.3 lb-ft)
Canister close valve installation bolt:
3.9 ~ 5.9 N.m (0.4 ~ 0.6 kgf.m, 2.9 ~4.3 lb-ft) |
Inspection [System Inspection] 1. Disconnect the vapor hose from the throttle body and connect a vacuum pump to the nipple on the throttle body. 2.
Description A ratchet tightening device on the threaded fuel filler cap reduces the chances of incorrect installation, which would seal the fuel filler.
Other information:
Hyundai Genesis (DH) 2013-2016 Service Manual: Specifications
S
Hyundai Genesis (DH) 2013-2016 Service Manual: Climate Control Air Filter Repair procedures
Replacement 1. Remove both stoppers (B) by turning them from the glove box (A). 2. Disconnect the air damper (A) from the glove box (B). 3. Remove the filter cover (A) by pressing the knob. 4. Replace the air filter (A) with a new one according to the direction of air filter.
Categories
- Manuals Home
- Hyundai Genesis Owners Manual
- Hyundai Genesis Service Manual
- Starter Repair procedures
- Smart Cruise Control Unit Repair procedures
- Body Electrical System
- New on site
- Most important about car

Copyright © 2026 www.hgenesisdh.com - 0.03