Hyundai Genesis: Auto Head Lamp Leveling Device / Auto Head Lamp Leveling Unit Repair procedures
Hyundai Genesis (DH) 2013-2016 Service Manual / Body Electrical System / Auto Head Lamp Leveling Device / Auto Head Lamp Leveling Unit Repair procedures
| Inspection |
| 1. |
Ignition "ON". |
| 2. |
Turn on the head lamp switch. |
| 3. |
Check that the aim of the head lamp changes smoothly when the head lamp leveling device switch is turned on. |
| 4. |
If it does not operate well, check the connector and terminals to make sure that they are connected.
If the terminals are bent, loose or corroded, repair them as necessary, and recheck the system.
If the terminal is in good condition, move to the step 5. |
| 5. |
Replace the head lamp assembly and check for proper operation. |
| Removal |
| 1. |
Disconnect the negative (-) battery terminal. |
| 2. |
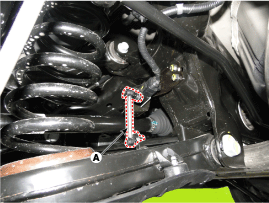
Remove the head lamp leveling unit linkage (A) installed on the rear left axle.
|
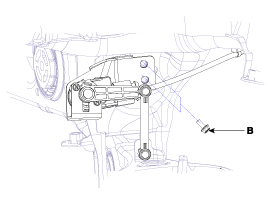
| 3. |
Remove the head lamp leveling unit assembly after disconnecting the unit connector (A) and loosening the mounting bolts (B).
|

| Installation |
| 1. |
Install the head lamp leveling unit. |
| 2. |
Reconnect the head lamp leveling unit connector. |
 Auto Head Lamp Leveling Unit Description and Operation
Description
According to driving environment and loading state of
vehicle, head lamp lighting direction is changed to keep the driver's
visibility range and to protect the driver's vision from ...
 Auto Head Lamp Leveling Unit Troubleshooting
Inspection with GDS
Initialization and diagnosis sequence by using GDS equipment.
The following is the summarized A/S procedure.
NoProcedure1Park the vehicle on level ground2Tire check3IGN1 ON4 ...
Other information:
Hyundai Genesis (DH) 2013-2016 Owners Manual: Fuel filler door
Opening the fuel filler door The fuel filler door must be opened from inside the vehicle by pushing the fuel filler door opener button. 1. Turn the engine off. 2. Push the fuel filler door opener button. 3. Pull the fuel filler door (1) out to fully open. 4. To remove the fuel tank ...
Hyundai Genesis (DH) 2013-2016 Service Manual: Rear Pillar Trim Repair procedures
Replacement • Put on gloves to prevent hand injuries. • When removing with a flat-tip screwdriver or remover, wrap protective tape around the tools to prevent damage to components. • When removing the interior trim pieces, use a p ...
© 2013-2025 www.hgenesisdh.com
