Hyundai Genesis (DH): Premium AVN System / AUX jack Repair procedures
| Removal |
| 1. |
Disconnect the battery(-)terminals. |
| 2. |
Remove the floor console assembly.
(Refer to Body - "Floor Console Assembly") |
| 3. |
Remove the multimedia jack tray (A) after loosening the screws from the floor console (B).
|
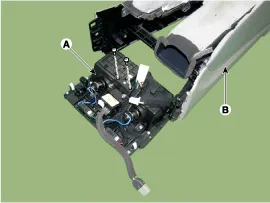
| 4. |
Remove the multimedia jack (B) from the floor console after disengaging the fixed hooks (A).
|
| Installation |
| 1. |
Connect the multimedia jack connector. |
| 2. |
Install the multimedia jack. |
| 3. |
Install the center fascia lower tray.
|

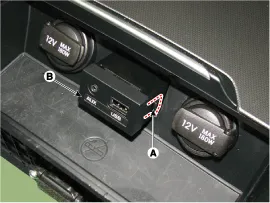
Description The multimedia jack on the console upper cover is for customers who like to listen to external portable music players like the MP3 and etc.
Inspection 1. Disconnect the negative battery terminal(-). 2. Remove the overhead console. 3. Remove the screws(A) and connector, Remove the hands-free mic(B).
Other information:
Hyundai Genesis (DH) 2013-2016 Service Manual: Auto Defogging Actuator Repair procedures
Inspection 1. Turn the ignition switch OFF. 2. Disconnect the auto defogging connector. 3. Verify that the auto defogging actuator operates to the open position when connecting 12V to terminal 3 and grounding terminal 4. Verify that the auto defogging actuator operates to the close position when connected in reverse.
Hyundai Genesis (DH) 2013-2016 Service Manual: Climate Control Air Filter Repair procedures
Replacement 1. Remove both stoppers (B) by turning them from the glove box (A). 2. Disconnect the air damper (A) from the glove box (B). 3. Remove the filter cover (A) by pressing the knob. 4. Replace the air filter (A) with a new one according to the direction of air filter.
Categories
- Manuals Home
- Hyundai Genesis Owners Manual
- Hyundai Genesis Service Manual
- Starter Repair procedures
- Electric Parking Brake (EPB) Repair procedures
- Repair procedures
- New on site
- Most important about car
